Battle Report: SweetLorraine (USA) vs. Zerocrack (Wehr)

April 3, 2009
REPLAYSweetLorraine (Infantry) vs. Zerocrack (Defensive) RETAIL 2.301

[Click link above to download the actual replay]

Somebody wrote "Corkscrew Blow ownz ya" on that shell

Somebody wrote "CorkscrewBlow ownz ya" on that shell. True story.

I know 2.400 is out, but as I said, there was too much done on this Battle Report to not finish it. In this edition, Rifles Ready! continues its series of Battle Reports focused on players who display fearless ingenuity in the face of proven, tenacious strategies. Case in point: this matchup between SweetLorraine (better known to sports fans as Kodachrome) and Zerocrack. It should be noted that Sweet and Zero are typically Wehrmacht and American players, respectively. At least, that’s what they played during their rise to fame back in the day, when I myself was grinding relentlessly up the 1v1 ladder.

These are proven, tenacious players, tough kids who’ve been in the COH world a long time. These seasoned veterans meet on the familiar killing fields of Angoville (and yes — I will do a different map next time, thanks to popular demand). It’s a standard tier 2/tier 4  strategy for Zero, while Sweet decides to fight a defensive army with a little defensive action of his own. There’s a veritable war of barbed-wire placing, plus a constant series of tank attacks and slowly escalating artillery barrages.

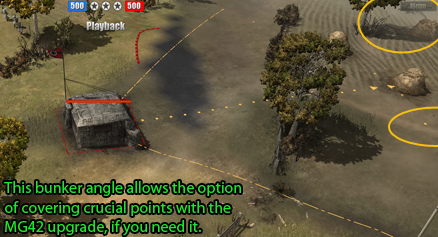
This is one unique game, sports fans. Let’s get right to it. The game is off to a rather unimpressive start, with very few direct skirmishes and the initial Volks/Rifles avoiding each other in favor of rapidly capping the left and right side of map respectively. The first real move comes when Zero puts up a Bunker on the left side of the map. It’s extremely well-positioned.

Bunker placement.

Bunker placement.

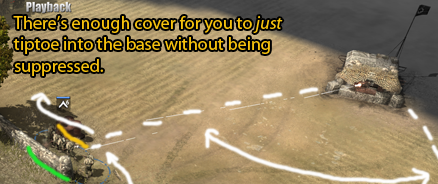
Zero has the option of creating an unflankable position by upgrading the bunker with an MG, then adding a garrisoned MG42 team. He ultimately goes for the standard Medic Bunker, but it’s a reminder of how solidly you can protect a position if you need to. Meanwhile, Sweet sends a Rifle squad into Zero’s base, neatly running right past the MG bunker, which gets off a burst but fails to suppressive the squad.

A chance for trickery.

A chance for trickery.

reliccoh-2009-03-28-13-47-15-99

Out of dodge.

The real question is why does he do this? Maybe he wanted to see if Zero was planning a fast-tech to tier 3 for Pumas, but it’s too early in the game for this. The Rifles engage a Volk squad in front of Reich HQ but it’s a total stalemate; they end up retreating quickly. I don’t have much an answer for why Sweet did this; presumably it was to scout, and eliminate the slim possibility that Zero was going for fast Pumas. But it’s so early in the game that even if Zero was going for fast Pumas, it’s unlikely he would be building a Sturm Armory. In any case, ruling out fast Pumas is probably the best explanation, because Sweet proceeds to OP his +16 fuel soon after his men get out of dodge.

Read the rest of this entry »


Battle Report: Riflemaster2000 (USA) vs. TheNoobSchoolBus (PE)

March 23, 2009

REPLAYRiflemaster2000 (Airborne) vs. TheNoobSchoolBus (Tank Hunters) RETAIL 2.301

[Click link above to download the actual replay]

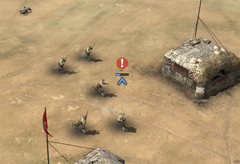
Packing heat.

Packing heat.

At long last, back by popular demand, it’s our critically-acclaimed Battle Reports! There have been a tremendous number of really cool matches in the last eight weeks, when Rifles Ready! went into hiatus. Every time you think all strategies possible in the retail game have been tried, somebody comes up with some new shit. This Battle Report and the next one (to debut next week hopefully) will showcase some fearless ingenuity. This game is between Riflemaster2000 and  TheNoobSchoolBus, two excellent players. I’m not familiar with either; they could be smurf account names for better-known players or they could be new and rising talent. If anyone does know, feel free to append this information to the comments for this post. Note I will refer to TheNoobSchoolBus as “Noob” for short — this assuredly is not intended as a comment on his skill level.

This match happens on the familiar proving ground of Angoville, where the resources are high — just like the stakes. Three things make this game noteworthy: one is a fantastic early (pre-panzershreck) base rush by Noob; the second is a remarkably illustrative series of opening skirmishes and the final is some terrific cat-and-mouse games highlighting the power of the Recoilless Rifle.

relic000021The game starts off with Noob (who spawns in the north position) aggressively pushing south in two directions, going both for Riflemaster’s left strategic point (SP) and his crucial top SP by the house. Riflemaster’s first Rifle sees the Panzer Grenadiers coming and hops immediately into the house. Given how annoying it is to have your opponent garrison this key civilian house, it’s always wise to send your first squad near the house, so that if you see the enemy coming for it, you can parry the attack by hopping in yourself. Next up, Riflemaster builds a Jeep, which is typically not recommended against PE opponents.

relic00004A Jeep serves precisely two functions against the PE: first, it kills Kettenrads (largely thanks to the pathfinding bug that affects Kettens whenever Jeeps get nearby) and second, it pushes PGs out of cover. Riflemaster finds Noob’s Ketten very quickly and eliminates it in short order. The disadvantage of building a Jeep? It leaves you significantly outgunned against your PE opponent, particularly if he chooses to mass his PGs together. In this game, you’ll see Riflemaster get an awful lot of utility out of his Jeep.

Read the rest of this entry »


Battle Report: Nystrom vs. SayNotoStim, redux

October 29, 2008
REPLAY: Nystrom (Airborne) vs. SayNotoStim (Terror) RETAIL 2.301
Stim wins via overall army tonnage.

Stim wins via overall army tonnage.

The first match between blast-from-the-past legend Nystrom and current pro SayNotoStim wasn’t quite the thrilling slugfest everyone expected. Nystrom teched to tanks, but too slowly to have any real effect. To quote Nystrom himself, “I was a noob with my tanks.” Yes, you were, my friend. But all that is past and gone, for these two champs slug it away a second time on Angoville.

It’s a better match this time, more evenly rounded in the early game, but it’s like an arm wrestling match that lasts a long time: one guy is clearly winning, but his opponent puts up a meteoric effort, lasting a long time but never able to reverse the tide.

Nystrom opens with a little wire and swings right; Stim goes left and builds a sandbag or two near the high fuel to give his Pioneers an edge over any Engineers. This is quite common in maps where the first thing you do is go for a valuable resource point in an open area. Early fights are often very important, particularly in high-level play, where few mistakes are made, meaning each small mistake puts a player behind for a long time, because it will take a long time for a good opponent to slip up and make things even. Having a sandbag also means you can cap while benefitting from green cover, which somewhat offsets the extra damage your squad takes while capping. This is great for stalling just long enough to cap that high resource point, meaning that even though you’re forced to retreat, your opponent must first decap it and is delayed.

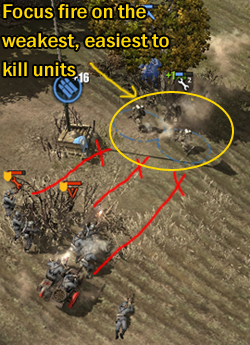
Moments later there’s a very instructive early fight at the top left high ammo point, just at the mouth of Nystrom’s base. Stim has a Volk squad, a bike and a Pioneer. Nystrom has one Rifle squad and one Engineer. He is outgunned. Both players target their opponent’s weakest unit, the unit most likely to die quickly to massed fire before it can be retreated: the Pioneer/Engineer. This is a great way to reduce early game capping power, plus it prevents synergy from happening because a dead Pio or Engy can’t repair bikes or Jeeps. Unfortunately, Volks and a bike do a ton of damage when focused on a single target, and Nystrom’s Engy takes extra damage while it tries to charge closer to Stim’s Pio. This quickly causes Engineer squad members to drop, and Nystrom is forced to retreat. Both armies here have equal yellow cover, and with his Engy gone, Nystrom knows his single squad won’t last long under that combined fire. But this is a pro we’re talking about here. He wouldn’t leave a squad fighting a fight it can’t win for no good reason.

His refusal to retreat the first Rifle becomes obvious: Rifle squad number two approaches from the rear and now Stim is solidly outgunned. The good thing about yellow cover from bushes is that it’s omni-directional. Terrain elements like walls, fences or vehicle carcasses only protect your men if your men are BEHIND them. But if your squad is in the middle of bushes and foliage, they’re considered in cover regardless of the direction of attack. But of course this small advantage isn’t enough for Stim to win; he retreats. This tiny little skirmish illustrates a lot of concepts crucial to COH (or any RTS, really): 1.) focus-firing the right target at the right time, 2.) retreating a wounded unit at the right time, and 3.) equalizing a fight however you can, so you don’t give up territory needlessly.

Read the rest of this entry »


Battle Report: Nystrom vs. SayNotoStim

October 19, 2008
REPLAYNystrom (Armor) vs. SayNotoStim (Terror) RETAIL 2.301
An old soldier heads back to war...

An old soldier heads back to war...

Nystrom is a legendary COH player from back in the day, I’ll always remember him for the way he advanced his Riflemen — in a circle, so that they could flank any target in that circle from multiple directions for the win. He returns after being away for many moons, to take on a new star who’s arisen in the meantime: SayNotoStim (aka CherrySlurpee). This matchup is certainly epic in the players involved, but I think being away from COH for so long as clearly taken a toll on Nystrom. There is certainly some very instructive gameplay here, but this isn’t quite the toe-to-toe, all-the-way-till-the-cats-come-home slugfest one might imagine it would be. The game is played on Angoville, probably the single bloodiest map in COH. The preponderance of high fuel and munitions points means a speedy trip up the tech tree, and the ease with which either player can be cut off from these crucial points means a constant battle over cutoff areas.

Read the rest of this entry »


Advanced Tip: Side-switching and avoidance

August 28, 2008

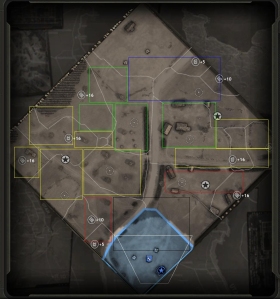
The zones are where fights favor the southern player.

The zones show where fights favor the northern player.

This will seem to be an overly simple “tip” for some folks, but I can’t tell you how often a situation arises where this tip isn’t followed. The premise is simple: you’re facing the Panzer Elite or the Wehrmacht and they just jacked up your army on one side of the map, forcing a general retreat. Now, about 90% of mediocre and even average players will do something very predictable — reinforce and go attack the SAME AREA THEY JUST LOST. Why is this not a good idea? Well, it really depends on the map, but on many, many maps,  you can simply SWITCH SIDES OR AVOID HIS ARMY. Take good old Angoville for instance — with the U.S. Rifle squad’s hyperfast 1.25 capture rate, you can retake the side of the map your opponent isn’t on, thereby assuring your flow of resources.

The disadvantages of facing your enemy again on familiar ground are many. First, he’s had time to spread his guys out, place MGs, find cover, etc. Second, he’s had time to lay mines, drop Butterfly Bombs, repair vehicles and call in reinforcements of his own. He is anticipating a counterattack — that’s the flow of all COH games, attack then counterattack.

Divide and bait
You can mix it up by moving where he is weak, a classic doctrine of master strategists. One piece of advice from ZeroCrack’s brief but succinct anti-PE guide for U.S. players is to AVOID your enemy where he is strong. Avoid him and retake territory he’s left open, so you can continue your tech and bait HIM into attacking your position.

This way it can be YOUR mines and barbed wire and troops entrenched in green cover that your ENEMY is forced to run into. Clearly this principle is best illustrated and best used in a U.S. vs. PE matchup given the two factions’ respective capture rates. The U.S. caps territory faster than you can blink while Panzer Grenadiers cap 50% slower than Riflemen.

Other maps
Most Relic-approved maps divide resources evenly, so it’s possible to do this tactic on just about every map. Of course, some maps are much easier to “switch sides” on than others. These include Angoville, Beaux Lowlands, Langres and Wrecked Train. Maps where you can’t effectively switch sides due to cutoff points, tight spacing and/or uneven resource distribution include Semois, Sturzdorf and St. Mere Dumont. These are my opinions based on experience of course; your mileage may vary.


Map-specific: The zones of Angoville

June 16, 2008

One of the most important aspects of being able to play COH well is knowing when and where to fight. One of the most common mistakes I saw as a mentor in COH was players overextending themselves early on.

This usually meant that they would be beaten back and have the tide turned against them very quickly in the game.

At the same time, I also see players gain advantages and simply let them go because they either didn’t know they had the upper hand, or didn’t know how to exploit it properly. I think the root of these problems comes from not understanding what areas in the map to fight on early in the game. Click the image to enlarge it:

Don\'t overextend yourself!

Here is a screenshot of Angoville that I have modified with Paint. You can see many boxes with 5 different colors. These represent the advisability of fighting in different areas of the map from the perspective of the northern player.

Blue areas represent excellent places to fight, they are near his base so units he is making from his base will join the fight sooner, along with any units that may have retreated and are coming back reinforced.

Green areas have the same qualities as the blue ones, but to a lesser extent.

Yellow zones represent an area where either player does not have an advantage by nature of his base being closer to the area being contested. To gain an advantage in the yellow zone, cover, buildings, and formation must be used.

Red zones represent areas that the northern player should not fight over unless he already he has a large advantage.

For Angoville, however there is an exception. A player that has captured the houses on the right hand side of the map can use those as a large force multiplier and can overextend himself more as long as he keeps control of the houses.

Black zones represent areas immediately outside his opponent’s base, and should not be pushed until later on in the game unless a very large advantage has been gained.